Bike Fit Course – Day 1
I’ve been looking forward to this Bike Fit course for ages. Like most mad keen cyclists, I’ve played around with my position on the bike a fair bit. I have to say, without any great success. I think I’ve really just got the bike fairly close to a good position, then adapted to it! By no means a bad thing…the body is awesome at adapting and that helps us daily, without us even knowing it 🙂
In my head, when thinking about bike fit I always end up running around in circles. One change leading to another and another….and another!! Couldn’t work my way out of the circle.
I signed up to Torke Cyclings ‘Bikefit Pro – Level 1’ Course. Quite a big investment at £650 for the 2 day course. It also gave you access to an online course that was to be completed pre-course. It covered foot/cleat placement in quite a lot of detail. I had some reservations after the online course as there was a bit too much emphasis on alignment for my liking. We talked about some of this recently – Hip Mobility in Cycling.
I travelled to Bath University for the 2 day course. There were 5 on on the course which meant there was plenty of time for conversation around all the topics. We all had to bring our own bikes and would be fitted during the 2 days as part of the learning process. The course was kind or split into two parts. Day 1 concentrating on the side view body position on at first…then foot/pedal interface on day 2.
Where to Start with a Bike Fit?
One of my big questions was where the hell do you start? How do you find a starting place without then having re-trace your steps once you’d made other adjustments. All would be revealed. The starting point is a preliminary look and potentially normalise anything that is glaringly out of the ordinary. This helps you brake that cycle by removing anything that will alter the results of your fit. Then you methodically work through the side view position of the rider.
Getting the foot in the right position over the pedal axle was the next job. I think therapists have a bit of initial advantage here as we are so used to looking at and palpating the body that finding anatomical landmarks is easy. Once assessed a quick cleat adjustment may be needed and then it’s back on the bike for the rider.
Side View Assessment
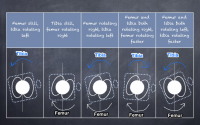
Then it’s time to work through the side view assessment:
- seat height adjustment
- saddle fore/aft
- stem length
- handlebar height
- hood/bar position/rotation
What I liked most of all was the course leader Tony’s approach. There are some norms that you can use for a reference, but you aren’t bound by them. They are a ‘ballpark’. You have to make your own decisions based on the individual in front of you. If you have been reading my blogs for a while, you’ll know that sounds a lot like my approach to therapy. I can tell you I was extremely relieved to hear this approach develop through day 1 and really helped me get in to the process.
As a beginner there is definitely a structure to follow, which really helps. However, it’s Tonys’ teaching really is brilliant, he gets you exploring the fit. Testing the edges so the rider can feel what is good, allowing the rider to feel if something else can be better or worse. Only then do you really know if you have the right adjustments.
The great thing was, we worked through the above list in order while fitting one of my fellow students on their bike. So you are getting real life feedback and making the bike adjustments. I really loved the practical nature of the course. The process was logical and methodical, using both rider feedback and observation to determine the best seat height, before moving on to saddle fore/aft etc.
There’s always Some Controversy!!
I think one of the things I was particularly keen to understand about bike fit was whether there was something to anchor the fit? I feel like there needs to be some constant that allows the adjustment cycle to be broken. Only then can you avoid constantly going around in circles having to make another adjustment because of the last adjustments.
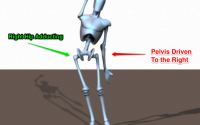
It was about half way through the day that I think I found it. The body will try to self optimise the angle of the torso. This makes sense to me from what I saw in the athletes I assessed over the 2 days. There is some controversy as to whether the body angle does self optimise…but it seems there’s always controversy in therapy and exercise around the key elements…I think we are all used to that now!!
From what I saw, the body angle did very much stay the same and the compensation for the different positions came from elsewhere. The shoulders seem to do a lot of the compensating as well as the position they sit on the saddle.
By the end of our first ‘group bike fit’ I was wishing I’d had the fore site to video the rider position before so we could compare. Never mind! Though it did make me think about my process when I do my first fit. I feel I will need a good video analysis tool and standardised set up. In the past I used Kinesio Capture, which was awesome!! They may have changed their name to Spark Motion now, something I’ll look into.
I was pretty shattered by the end of the day, though really looking forward to day 2. Which I will post about shortly.
Physioblogger
To Read Part 2 Click Here – Bike Fit Course – Day 2