Bike Fitting Course – Day 2
Last week was about Day 1 on the Bike Fitting Course run by Torque Cycling. Had some great feedback and questions.
I think it’s fair to say I was pretty happy after day one and was certainly looking forward to what was in store today. The plan was to move the learning to the feet for the first part of the day. Then bringing it back together in the latter part of the day doing complete bike fits with both the side view Ax and the Foot Ax.
Having expressed my doubts about the knee alignment part of the course, in previous posts, I was pleased to see that there was far less emphasis on alignment in the eyes of our teacher. The philosophy he proposed was that you were trying to get the best fit for that person on that bike. There was far more emphasis placed on rider feedback than on angles and alignment…truly was music to my ears!!
Looking at the Knees
We did look at each persons knee alignment using the vertical laser. Seeing the pattern of the knee relative to the 2nd metatarsal…reminded me of doing Paul Chek and NASM courses back in the early 2000’s!! However, I believe that was folly then and that this is no different. Nothing wrong with looking at what they are doing and making changes that make sense for the rider, but forcing them to pedal with their knee and 2ndmetatarsal in perfect alignment…come on, we’re way past that now I’d hope!
I certainly think that making simple adjustments to normalise and clear issues could help, but I feel that here is where being a therapist as well as a bike fitter will really pay off. If the alignment is a long way our there is very little adjustment that can make that much difference. For me the likely culprit is in the body and that is where the solution is likely to lie. Though I think that can wait for another post.
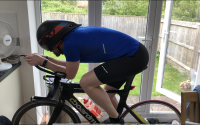
My Bike Fitting
Next, it was my turn to have a bike fitting. Was really looking forward to it. I felt extremely comfortable on my bike, no discomfort or pain, even on 7-8 hour rides. I’ve done 1000’s of miles on it. So, I didn’t feel it was far off.
First obvious thing was the reach to the bars. The angle at my shoulders was way off!! This is where Tony was really good. Didn’t rush to judgement, just noted it and got on with the process. He’d be a great physio!
After the cleats were moved into place so my feet were over the pedal spindle properly I felt a bit weird on the bike. Not uncomfortable, but it didn’t feel like my bike. However, once the saddle was tweaked down slightly (5mm) and brought forward 5mm it was amazing! Suddenly it felt like my bike again. It felt like no adjustments had been made at all. It felt great.
Now for the stem length. I knew my stem was a bit too long and I had contemplated buying a new one, but just never got around to it. On goes the Stem Adjuster and they tweak it back 1 cm. Again, the difference in comfort was marked. Not just a little better, it was a lot better! Again, as Tony would say, you haven’t found the edge of the bike fit window, so you don’t stop there. Another 1cm shorter stem and another massive difference! However, this time it felt awful! I honestly can’t believe the difference such small changes make. We went back forward 1cm…amazing, then back to my original stem, not bad, but clearly we have a bike fit winner…so I have to find a 1 cm shorter stem 🙂
Last Bike Fitting on the Course
We did one more bike fitting and it was clear to see that the confidence was growing. Observe, communicate, adjust, repeat. Bike fit is a really fun process. As we made adjustments we talked around possible problems and different issues that might occur. For example, if you can’t find the right seat height because, for what ever reason, when one leg is happy, the other isn’t. You may have to use a leg length shim and repeat the seat height process. Also, integrated bars/stem?? Bikes are more commonly having highly integrated bars…how do you deal with that? Possibly fit them on another bike or bike fit jig? Also, what if they have an £800 integrated cockpit and you tell them the stem is 1 cm too long. Mine was, though lucky cheap and not integrated!
Summary
It’s fair to say I was buzzing when I left. I have quite a few volunteers who fancy a free bike fit for me to practise!! Not really a surprise I guess 🙂
I can’t wait to do my first one, though there’s a fair outlay for getting set up. The biggest expense is a sizing stem, that’ll set you back about £250! Then there’s a fair bit of kit you need, laser, tripod, cleat screws, shims, wedges, it all adds up. I’m in the process of getting all the things I need together, which has given me a bit of time to think how the whole thing is going to work. I’ve signed up for a Spark Motion account, so the video analysis is sorted, though I’ll have to work out how to use it!
I hope to do my first one shortly, so I’ll write a post and let you know how it goes 🙂
Physioblogger
To Read Part 1 Click Here – Bike Fitting Course – Day 1