Describing Movement
What we are doing here is building the movement picture. How do you get someone to do the movement you want? What cues do you use to make sure that the desired outcome is subconsciously driven? There must be a million ways to do it and in time you will find the way that works for you, but as a starting point, this is the process I would use to get you started.
You have to think about:
- What is the starting position?
- What is the Driver?
- Which Direction are you Moving in?
- What height, speed and distance is the movement driven?
- Are you using any resistance/equipment?
It’s super important to get this clear so that when you start assessing and treating this language is all second nature.
What we are looking to do is use simple clear way to get our patients moving in the way that we want them to move. In doing this we will build up a simple system that will be the cornerstone of your functional assessment and movement strategies.
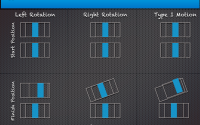
It’s important to start off with that you understand the difference between position and motion. Don’t be fooled by a starting position. you can be flexing the hip but from an extended position, like the initial swing phase in gait. So, if you saw a photo it might be that the position is extended, however, the leg is swinging forward, so clearly the hip is flexing.
You can see even in the language we use here ‘extended’ implies a static position, whereas, ‘flexing’ is a movement.
How do we Describe Movement?
This can get endlessly complicated, so we are going to keep it as simple as possible. To be honest, the greatest gains come from this initial understanding and you can progress and make it as complicated as you want later on. Here is a basic outline of my thought process:
- Goal
- Starting Position
- Movement Description
- Drivers
- Variables
- Equipment
1 – Goal
This is always your starting point, it’s really important to have intention and then either hit it or learn from why you didn’t/couldn’t. There are any number of goals, so I’ll just quickly list the most common ones I see:
- Create or test a particular joint range
- Load a muscle in a particularly plane/planes
- Expose a joint/joints to a specific movement pattern
- Spare a joint/joints from a specific movement pattern
- Expose injured tissue to controlled/progressive loading
- Spare an injured tissue from loading while loading others
- Graded exposure to previously fearful movement patterns
This is just a start and your goal can actually be anything you choose. Have a goal and you can learn from the results whether you achieve your goal or not.
2 – Starting Position
Clearly, this is pretty key…you need to know where you are starting from, or you can’t know where you are going! As a basis I would say the majority of the time I start in what I’d call a neutral stance, standing upright, feet shoulder width apart, but clearly you can start in many variations:
- Standing upright, feet narrow/wide
- Standing upright, feet in split stance right/left foot forward
- Foot on a step
- Lying on front/back/side
- Kneeling on all 4’s
- Kneeling or half kneeling
- Single leg stance
3 – Movement Description
This is simply what you want them to do as the main movement. It could be considered as a driver, key thing is that the patient is moving. Here are the most common ones, but again it’s only a starter list:
- Squat
- Lunge
- Jump/hop
- Reach
- Step
- Rock
- Push/Pull
4 – Drivers
This is where you get to put your individual stamp on the movement. Using any driver e.g. hand, foot, knee, pelvis…you can make a squat bias one glute over another, you can fire up glute medius and minumus with an added reach. I think this is where the real magic is. It’s where you can be creative, use your imagination, where you are really treating the individual. This is where you can design and adapt your own assessments and treatments that are specific for the person in front of you with this injuries needs in mind.
Combined with the next section on variables, you can individualise any exercise you want.
5 – Variables
Of all things discussed here, this combined with your drivers gives you the freedom to build movements for your patients. So if you’ve soaked up all the information I’ve given you so far, this is where you get to exploit it. Once you understand the movement variables you can do anything you want.
The drivers are the first part of the equation, but then it’s what are you doing with it? The most commonly used driver for me is the hand, but what are you doing with the hand? Lets say I want to use a right hand driver to create motion in the hip. If we start in a neutral stance, feet shoulder width apart. Reach your right hand forward as far as you can forward at hip height…loads of hip flexion. If you change that to a right hand left rotation reach as far as you can at shoulder height…loads of right hip internal rotation. You get the idea, you now have the ability to influence any joint in any way you choose. Before we go on, lets look at what variable you can use:
The 4 key variables to get the hang of are:
- Direction – Which direction are you sending the driver?
- Height – What target height is the patient aiming the driver?
- Distance – How far do you want the driver going?
- Speed – How fast are they moving in and out of the movement?
- Theraband
- Dumbbells
- Barbells
- Steps
- Unstable Surface
6 – Equipment
It is beyond the scope of this book to cover equipment in enough detail to do it justice. However, I thought it important to mention that progression and regression can come from adding/taking away equipment. Often we are a little limited in a clinic room, unless you have a good rehab set up. Even if you do, you often need exercises people can recreate at home, so over use of equipment in clinic doesn’t always help. The most common equipment is:
We’ll get plenty more time to discuss these and many more in more detail in future posts.
Physioblogger