How Muscles Work!
It’s been a bit of a foot festival over the last few weeks!! For those of you who have followed my previous blogging there’s no real surprise there 🙂
I wanted to follow up on the rehab process we’ve been building the last few weeks, but perhaps take it away from the foot directly. So today we will have a look at a bit of the process behind the rehab and look at how muscles work and how to use this knowledge in your exercise selection.
We’ve covered before how bones move and how that helps us determine what the joints feels and how the joint is feeling that motion. Now what does that means for the muscles and how do we apply our thought process to them?
When we learn the anatomy of the muscular system we learn the origin, insertion and what happens to the joints the muscles cross when the muscle shortens/contracts. I’m pretty sure we all learn it like that…I know I did!
The real difference between the traditional model of muscle function and the thought process I use is that I think of muscle function in terms of how the muscle is loaded. This means understanding how the muscle is lengthened…in all 3 planes.
The reason for this is because it gives you are far greater opportunity to understand how the muscle fits into the function. Whereas the traditional teaching simply gives you the origin, insertion and concentric action. It is also common place to only teach the concentric action in the plane with the most range. For example, I was taught that the hamstrings flex the knee and extend the hip. Though this is true, it greatly underestimates the full capabilities of the hamstrings. It also makes it very difficult to understand their true function from the concentric action.
Once you have determined what the joint feels it is much easier to see the reaction of the associated muscles. This in turn helps you build exercises, build manual therapy strategies and get people moving better in minutes rather than weeks.
A good friend of mine once told me that anatomy books would be great if you could take out all the writing…and that is how I learned functional anatomy. You look at the muscle, where it comes from, where is goes too and then look at one of the joints it crosses and decide which joint motions would make that muscle longer in all 3 planes…simple as that. Though this doesn’t explore the full capabilities of the muscle, it brings you a lot closer than knowing the concentric action in 1 plane.
Putting it into Practise
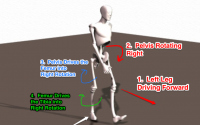
Lets use a more practical example. If I want to fire a particular muscle in your rehab, I will try to lengthen it in all 3 planes. The one I get asked about most commonly is how to fire gluts! So lets do that…I suggest you look at the muscle in an anatomy book to follow my thought process. In the sagittal plane it is fairly obvious it is lengthened in hip flexion. In the frontal plane the glute lengthens with hip adduction and in the transverse plane it is lengthened with hip internal rotation. So now I need to create those motions with an exercise or exercises.
There are millions of options, but the obvious is an anterior lunge. This actually creates all the motions you need in different proportions (hip flexion (a lot), adduction (a little) and internal rotation (a little)). However, lets look a little deeper and see how we can really play it to make sure that glute gets fired up.
Sagittal Plane
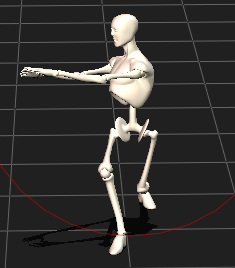
You already have a lot of hip flexion in an anterior lunge, but you can increase the sagittal plane intensity felt by the glute in many ways. My quick hitters would be to reach forwards with both hands while you lunge at about hip/knee height to create more hip flexion. This is great if they have knee pain, potentially not so great if they have back pain. If they have back pain I might ask them to lunge onto a step instead, still get more hip flexion, but not driven through the back.

Frontal Plane
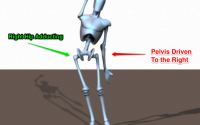
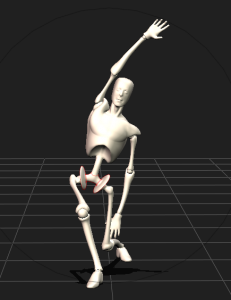
To increase right hip adduction they will be lunging onto their right leg and then I ask them to reach over head towards the left with the right hand. This drives a lot of right hip adduction. If this isn’t possible (shoulder pain, back pain etc) I may switch exercise and use a frontal plane pivot exercise to fire the glute in the frontal plane.
Transverse Plane
The most common way to do this is with a transverse plane hand driver (one or both) at shoulder height. If it’s the right glute again, you will ask them to drive the arms into right rotation as they lunge onto their right leg. Simple, but devastatingly effective!!
Summary
Like I have said in the previous posts, these 3 steps are the foundation of my exercise and manual therapy strategies. If you know how to understand and predict what you should be seeing from the bones, you can understand the joint feelings and make the muscles react the way you want them to react.
There is so much more to this concept than I can possibly cover in the blog. I suggest reading the post on the Laws of Muscle Function to get a bit more in depth on muscles.
Physioblogger